
Morgan +4 Forum
Vacuum leak/Carb Issue
Posted by Crowbar


|
Crowbar
Greg Chronowski
|
Topic Creator (OP)
Jul 16, 2025 08:07 AM
Joined 10 years ago
49 Posts
|
Thanks for the tip Jan...
It actually turns out that the drain bung is 1/4" NPT and I was easily able to find a petcock that fits on Amazon.
My problem with the sensor bung is that the bung is too small for the sensor - so a reducer bushing won't be any help.
Laurence - your solution is far nicer than my solution of cutting up a piece of scrap plastic to fit. I think I'll try it - does it help with cooling?

1854sailor
Paul Powichroski
|
Jul 16, 2025 08:27 AM
Joined 4 years ago
393 Posts
|
 |
Jul 16, 2025 11:18 AM
Joined 2 years ago
165 Posts
|
Greg, I am convinced that this helps with the cooling for the car. After driving for 45 minutes in 94 degree weather I measured the outside block temperature at 194 degrees. The gauge reads just above mid-point. Let me know if you are interested in more pictures or dimensions on the air trap.
Paul, If my recollection is correct, after I had Morgan Motors rebuild the temperature gauge I heard that both the new sending unit as well as the previous sending unit are quite unique and not a simple replacement. Still, I might be wrong about that.
Laurence Plott
1962 Morgan Plus 4
1966 Jaguar E-Type
1960 MGA
|
SJM1
Jan Morgan
|
Jul 16, 2025 12:22 PM
Top Contributor
Joined 8 years ago
2,310 Posts
|
The term "reducer bushing" goes both ways... You can get a bushing to fit your larger thermostatic switch into a smaller hole,
There are bushings that can handle your larger temp switch. Also, there are smaller temp switches available that will reliably trigger your fan.
Smaller male to larger female bushings are available
American volt has them in various temp ranges. There are others as well, including SPAL, and others available at your local auto parts store or speed shop. Once you know what the thread is, you can select aone that fits directly, or use a bushing.
Edited 1 time(s). Last edit at 2025-07-16 12:56 PM by SJM1.
about 1 week and 4 days later...
|
Crowbar
Greg Chronowski
|
Topic Creator (OP)
Jul 27, 2025 07:55 PM
Joined 10 years ago
49 Posts
|
In reply to # 28564 by SJM1
The term "reducer bushing" goes both ways... You can get a bushing to fit your larger thermostatic switch into a smaller hole,
There are bushings that can handle your larger temp switch. Also, there are smaller temp switches available that will reliably trigger your fan.
Smaller male to larger female bushings are available
American volt has them in various temp ranges. There are others as well, including SPAL, and others available at your local auto parts store or speed shop. Once you know what the thread is, you can select aone that fits directly, or use a bushing.
Hi Jan...if only it were as easy as ordering a new sender

My understanding is that the orginal TT1200/01 Temp Sender used in the +4 varies the resistance in the wire to give the gauge a value. Just about every temp sensor made today, including the ones you mentioned, vary the voltage...In order to use the variable voltage senders you have to send out your quadrant gauge to be modified... If anyone knows of a variable resistance sender out there - please share - but I haven't been able to find any.
I'm going to explore finding an "adaptor" bushing to take the 5/8" - 18 thread of the original sender to fit into the M14 1.5 bung on my new aluminium radiator. I also ordered a 5/8" - 18 tap and may just try and re-tap the bung on my new radiator.
My understanding is that to use the original TT1200/01 Temp Sender in an aluminum radiator that the sender body needs to be grounded as the aluminum radiator itself dosen't serve as a particularly good ground.
Does anyone have any recommendation on how to ground the original Smiths TT1200/01 Temp Sender? It appears to be brass, should I just solder a wire to the housing? I was thinking a loop terminal over the threads between the sender flats and the radiator itself might work. Any suggestions appreciated!
|
SJM1
Jan Morgan
|
Jul 28, 2025 09:46 AM
Top Contributor
Joined 8 years ago
2,310 Posts
|
Engine temp sensor?. For the temp gauge? Why do you need to put the engine temp sensor into the radiator? Why not stick it into the original temp sensor location on the engine? It should already fit there.
Put a pipe plug into the radiator bung, and install the sensor into the engine's temp sensor location, or into an adapter in the water hose.
If you have an electric fan thermo switch, install that into the radiator. There are numerous switches that will fit. If you are switching a fan, you can use a relay and any fan switch with the value you require.
Also, you can easily check the accuracy with any temp sensor by placing it in hot water of a known temp and checking your gauge. That's how I calibrated my cluster gauge.
|
Crowbar
Greg Chronowski
|
Topic Creator (OP)
Jul 28, 2025 10:41 AM
Joined 10 years ago
49 Posts
|
|
SJM1
Jan Morgan
|
Jul 28, 2025 02:16 PM
Top Contributor
Joined 8 years ago
2,310 Posts
|
|
Crowbar
Greg Chronowski
|
Topic Creator (OP)
Jul 29, 2025 02:56 PM
Joined 10 years ago
49 Posts
|
Jan - thanks for your patience with me!
Right now, my thermostatic fan switch is here:

and my gauge temp sensor is here:
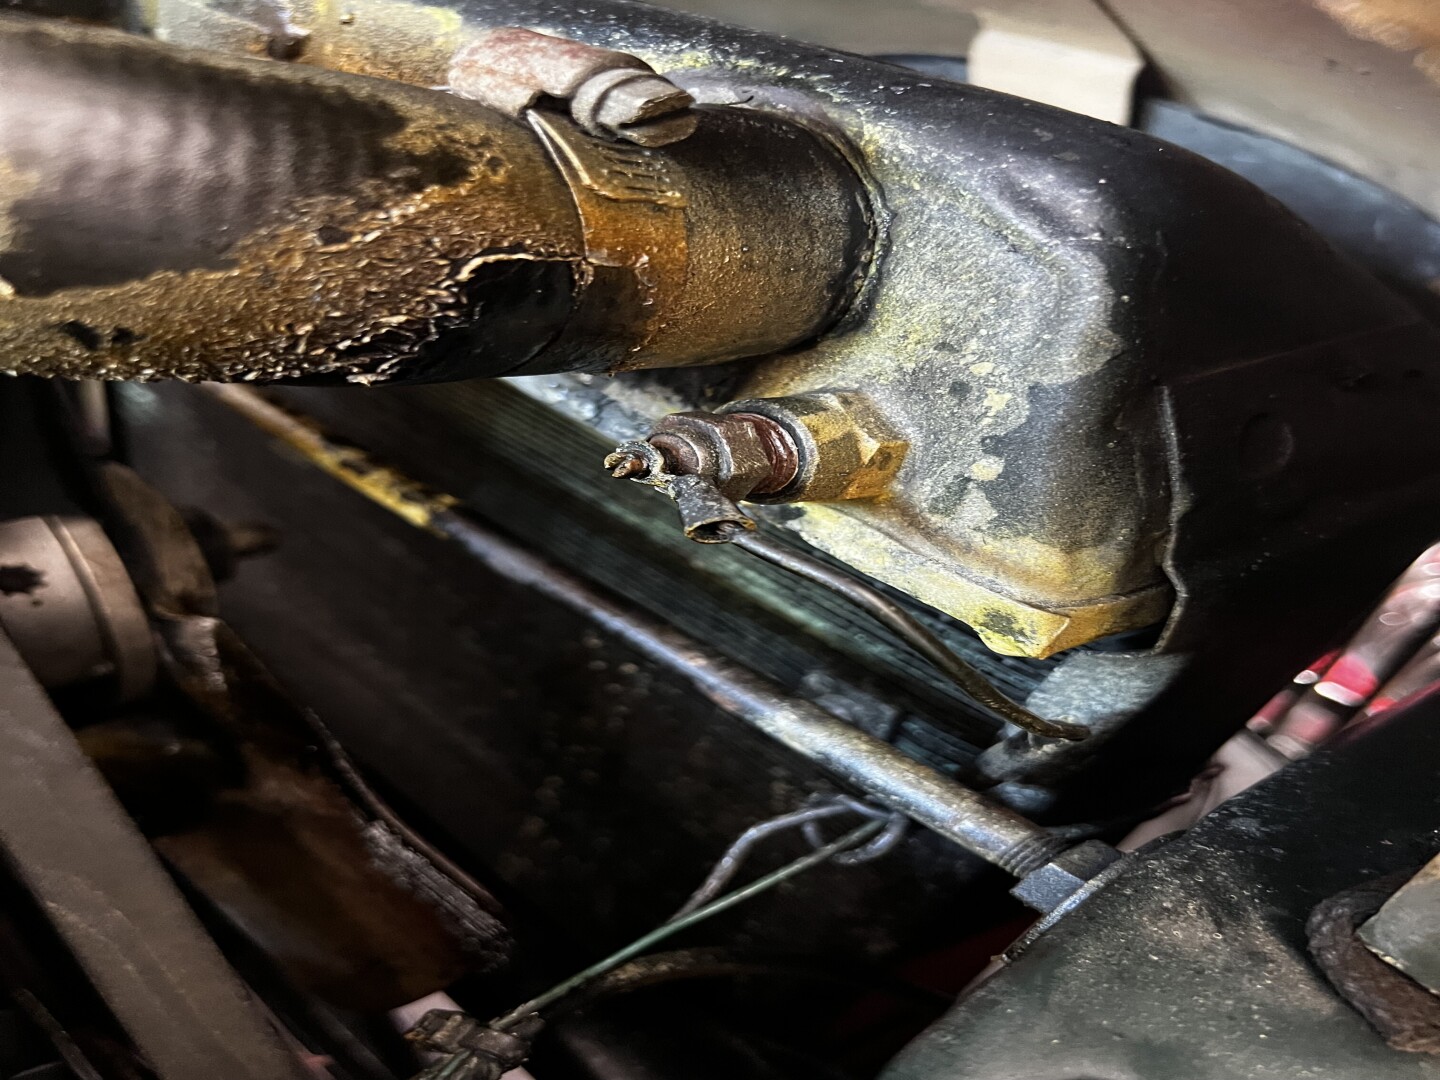
You are wisely suggesting I switch the two sensors' locations - no?
If the fan switch bunghole is still 5/8" - 18 I could buy a new fan switch that fits the radiator and I should be all set!
Any suggestions on what temp switch I should buy? what temp should the fan turn on? 120 degrees?
Hopefully the fan switch bung hasn't been re-tapped
Right now, my thermostatic fan switch is here:
and my gauge temp sensor is here:
You are wisely suggesting I switch the two sensors' locations - no?
If the fan switch bunghole is still 5/8" - 18 I could buy a new fan switch that fits the radiator and I should be all set!
Any suggestions on what temp switch I should buy? what temp should the fan turn on? 120 degrees?
Hopefully the fan switch bung hasn't been re-tapped
|
SJM1
Jan Morgan
|
Jul 29, 2025 03:30 PM
Top Contributor
Joined 8 years ago
2,310 Posts
|
The temp indicator sending unit should be installed on the engine, under the thermostat., in the position you have thoughtfully provided a picture of (the parts are more easily identified in an actual engine picture than they are in one of the exploded views of the cooling system components. Thanks again for providing this!) That should work fine (original, and correct), and probably fit without an adapter (though in some situations, one might be necessary. From the looks of your setup, it should just thread into place. You can use a little Yamabond or Hondabond on the threads, or not...Doesn't matter as pipe threads are tapered and should seal. That said, I usually use Hondabond or Yamabond (same bond, different motorcycle shop).
From the looks of your engine, new hoses are in order, along with new clamps.
Your fan switch should be installed in the radiator (and that thing looks tired. Good thing you have a nice shiny new one. The top is the return, the hot portion, so putting it there is certainly OK. The bottom works as well (for the record, most of my radiators have the thermostatic switch at the bottom). All we are doing is getting the fan to turn on and create the airflow that will promote cooling at low speeds. I don't know where your rad's bungs are located, but it really doesn't matter much. Just pic a hole and put the switch there.
I would probably get a switch that goes on around 185F (when the thermostat is open), so that the engine doesn't run too cold. The trick is to maintain a temp of around 165~185F (185F on, 165F off). With your new, more efficient radiator, your system should run "on the thermostat" (at or around thermostat value), keeping about 165~185F all the time, save for VERY hot weather. With a 165 thermostat, your fan should turn off when there is enough air flow to maintain that temperature. No need to run the fan when there is more than enough air flow when driving at 50~60 mph.
There are many thermostat switches available, and many adapter bushings. Don't overthink this. If you get a two terminal switch, you can just ground ione of the terminals to the chassis or engine. The switch will just close the circuit. You may want to install a relay to protect the switch. Have the switch fire the relay, which will take the 12V load to run the fan. Some switches are strong enough to run the fan without a relay, but some are a little weak, and will benefit from a relay in the circuit to keep the major electrical load from burning it out. Don't ask me how I know this... My Lotish now has a relay for the fan...
There are switches available from Summit, Jegs or your local speed shop. SPAL and others have fan power relay wiring harnesses that include the relay. All you need to do is to select a switch. If you want to wire your own (not difficult. I think that Moss has a video for relay wiring), you can get the original Lucas wire in the appropriate color from British Wiring. They also have the color code listing on their website.
The radiators always have ordinary bungs for various sensors to be installed directly or with adapters. All you need to do is to determine if you have BSP, NPT or NF threads, then select the bushing adapter that handles both male and female threads.
One more thing. I am definitely not in favor of "bypass" or manual switches for the fan. These are easily forgotten at the worst times. Every modern car has switches the work automatically and here is no reason that you can't have that advantage for your Morgan. Just get a good quality switch and relay.
Here is a switch from Amazon that requires a 160F thermostat. It is 185 on, 175 off, which is a good combination. Inexpensive, includes relay and one reducer. You may need a different reducer. This should work well, and turn off the fan when it is not needed.
https://www.amazon.com/Electric-Radiator-Thermostat-Temperature-Waterproof/dp/B098XB9RB5/ref=sr_1_2_sspa?dib=eyJ2IjoiMSJ9.X5YpdHtqS_pKPDIkB4_NJergqZ_Z6Qon28xfPtMUoJzt3qVIW2ZTuFCzEIpdEQVQrTQvRIM2KJGT8lwaV91V9jFx_naY3Zu03MgF0SJMcj9j816FP8D1pqhHakMsjnR9wmKg-GOxAUMinzG7E2NjzuHT34kFQazPkgRlNd0OR5b0bTZ2CaPe6oxr9-92bkrWVEAwZ5VH4icufuJucGrr2BP4TVm-OUDWR-jT--zuKSg.KbpXOtLrJEFh_bYAM9uaN5zLujGLtIdR2RgxJIDv3SY&dib_tag=se&keywords=cooling+fan+switch&qid=1753835769&sr=8-2-spons&sp_csd=d2lkZ2V0TmFtZT1zcF9hdGY&psc=1
Edited 2 time(s). Last edit at 2025-07-29 07:41 PM by SJM1.
|
Crowbar
Greg Chronowski
|
Topic Creator (OP)
Jul 30, 2025 12:40 AM
Joined 10 years ago
49 Posts
|
So this comedy continues...
The gauge sensor is too long to fit into the 5/8" bunghole near the water pump...and I absolutely cannot find a 5/8"-18 insert to stand it off enough to fit.
Frankly the whole issue with everything I've tried is finding adaptors or reducers that can accommodate the 5/8"-18 UNF thread...it's just incredibly uncommon...McMaster Carr, JEGs, Summit and others have been no help.
I did find a 5/8"-18 female to 14mm 1.5 female adaptor...so that allows me to hopefully put the gauge sensor back in the new radiator with the 14mm 1.5 bunghole...it may require some reaming of the ID to fit..we'll see
If not...I'm just retapping the radiator bunghole to 5/8"-18 and washing my hands of the whole deal!
Lesson learned - cheap eBay radiators seem attractive...but don't believe them when they say they will "fit" in a Morgan +4...modification will likely be required...especially if you're using the stock gauge sensor with an unmodified quadrant gauge.
|
SJM1
Jan Morgan
|
Jul 30, 2025 09:54 AM
Top Contributor
Joined 8 years ago
2,310 Posts
|
Don't put the gauge sending unit into the radiator. Don't drill and tap anything. You could be causing all sorts of trouble down the road. Try Moss Motors or Morgan spares for the fitting to put the sending unit into the correct position under the thermostat. You can also find the correct sending unit that will fit. I am thinking that there is some confusion as to which sending units you have, and what they are connected to.
What color is the wire that is supposed to go to the temp sending unit? Have you tested the sending unit for your gauge by putting it into hot water? I think that it is time to check the wiring scheme and test the sending units for function. Perhaps there is some confusion. In most cases, the factory got it right the first time.
Often, "previous owners" have done some unusual things to basic original systems, causing all sorts of problems down the road. Plus 4s are pretty common, as are the TR engines and their sending temp gauge sending units. There is something that is basically wrong with your setup.
My Morgan had several "improvements" by the previous owner, all of which had to be set right, back to the original factory configuration. This involved sending units, thermostat switches, similar to the situation that you have.
|
Crowbar
Greg Chronowski
|
Topic Creator (OP)
Jul 30, 2025 11:23 AM
Joined 10 years ago
49 Posts
|

DuncanCharlton
Duncan Charlton
Elgin, TX, USA
Sign in to contact
|
Jul 30, 2025 01:05 PM
Top Contributor
Joined 10 years ago
1,284 Posts
|
These documents refer to Smiths gauges and senders. Appendix A of the Gentleman's guide to Smiths Gauges lists the applications and types.
Duncan
Edited 1 time(s). Last edit at 2025-07-30 01:17 PM by DuncanCharlton.
Duncan
Edited 1 time(s). Last edit at 2025-07-30 01:17 PM by DuncanCharlton.
Attachments:
Smiths gauge manual.pdf 1.87 MB
about 3 weeks and 2 days later...
|
Crowbar
Greg Chronowski
|
Topic Creator (OP)
Aug 22, 2025 01:29 PM
Joined 10 years ago
49 Posts
|
So as a coda to this fiasco...
I retapped the bung hole in the radiator to 5/8"-18....badly. Did it with a hand drill...stupid idea (I really need a drill press...)
Coolant leaked around the Smiths temp sensor...
Briefly considered installing a helicoil...but I understand they're not waterproof...
Bottom line - I gave up and ordered a high capacity aluminium radiator from Morgan Spares.
Lesson learned. I did think the quality of the EBay radiator was OK...but if you decide to go this route, insure that the sensor bung will fit the sensor that you have in your car. It's impossible to find reducing adaptors for 5/8" - 18 UNF threads...everything out there is NPT threads...
Many thanks to everyone for their help - especially Jan (who probably lost his patience with me a while ago
Having trouble posting or changing forum settings?
Read the Forum Help (FAQ) or click Contact Support at the bottom of the page.
